June 24, 2022
We’re living in a phygital world. Even before the pandemic drove everyone to online-only shopping, most offline purchases already involved at least one digital touchpoint. But now, our own research tells us that 63% of consumers research online before visiting a store. In this context, user-generated content (UGC) has been a major catalyst for purchase decisions.

UGC is a blanket term that covers any and all content created and shared voluntarily by customers — separate from paid influencers and brand advocates. This includes social media, blog posts, product reviews, unboxing, and first-time-use videos. An almost limitless array of formats. Now, as customers return to more hybrid shopping on and offline, UGC can be a linchpin in a brand’s omnichannel strategy.
“Phygital” bridges the gap between the physical world and the digital
In this “phygital” environment, retailers need to combine the best of digital and in-store experiences. UGC helps promote the customer’s voice in an authentic, relatable, and real-life way that no traditional marketing strategy can typically deliver. So how can in-store and online UGC promotion create a symbiotic, mutually beneficial relationship for retailers and customers?
We’ll share a handful of tactics you can try yourself, with a few examples of how others are making it work.
1. Scan QR codes for product reviews
A study by Yes Marketing found that customers shop in-store because they want to see things in person. But when they’re in-store and can’t find information about a product they’re considering, they won’t hesitate to pull out their phones for on-the-spot searching. One of the best tools for the phygital world is the humble QR code.
You likely know that smartphone cameras function as built-in QR scanners, but we bet you didn’t know that the “QR” in QR codes stands for “Quick Response.” QR codes are a cost-effective and highly versatile tool for instantly providing detailed information in a quick but high-value interaction.
Though retailers might have initially viewed their digital and physical shopping experiences as mutually exclusive, the reality is that they supplement one another. So it’s time to jump on the phygital bandwagon.
Customers are already well aware of the vast content available at their fingertips to inform their shopping decisions. Real customer reviews are a powerful form of UGC that shoppers rely on to make confident purchases. Why not make it even easier for them to access these reviews in the moment?
Add strategically placed and visually prominent QR codes to your product displays so that shoppers can quickly scan them and find the reviews they’re looking for. Keep in mind that any page where users are being directed needs to be optimized for mobile.
QR codes can also be a helpful driver for creating UGC. Printing codes on product packaging or price tags can make it easier to encourage customers to leave a review with a single scan.
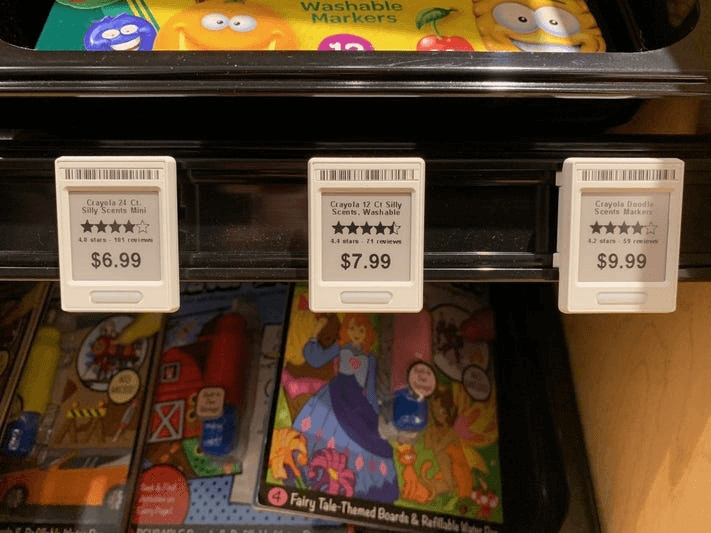
2. Show real-time star ratings and review counts
Electronic shelf labels (ESLs) are a fairly low-tech but high-impact way of letting retailers display live star ratings alongside products in-store. Leveraging basic e-ink displays, ESLs make it easy for retailers to wirelessly update live counts of ratings, reviews, and dynamic pricing. Among other inventory management benefits. When Amazon launched its brick-and-mortar Fresh grocery stores, it introduced ESLs. This is a prime (pun intended) example of the phygital era in action.
According to Grocery Dive, this move was a subtly differentiating power play that contained Amazon’s secret sauce: an enormous volume of customer ratings. “With the exception of produce, just about every other item in the store, including center store consumables and even fresh seafood, prominently display UGC generated by Amazon’s shoppers. Now shoppers can both physically handle the product and see in the ESL display that other consumers have tried the product and liked it.”
This also helped Amazon gather useful data about which of its private label brands could stand up to the perceived quality and popularity of name brands.
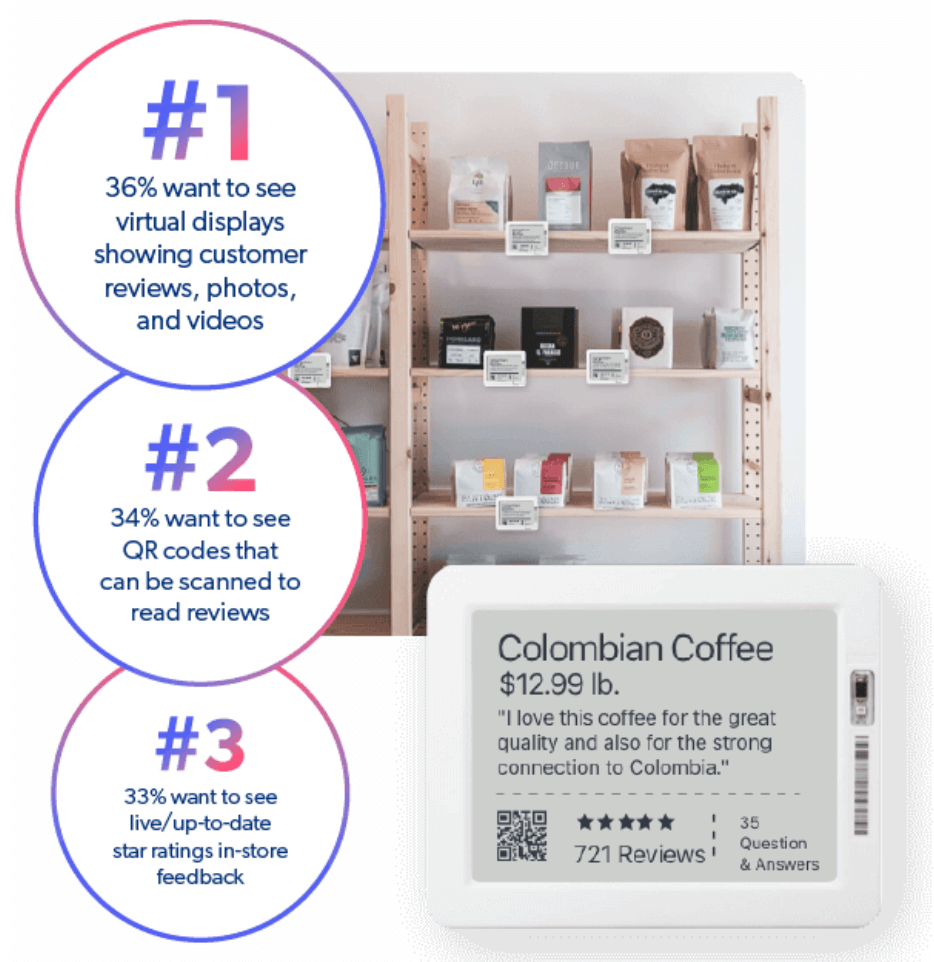
3. Create visual UGC displays
One incredibly straightforward way of introducing UGC in-store is to install visual displays. This could mean leveraging visual UGC in printed brand and marketing assets, like promotional banners, posters, stickers, and window displays. But it can also mean digital installations, like “social screens” that feature curated feeds of branded hashtags.
These displays can bring a vitality that printed materials cannot, but their effectiveness is limited. Christine Russo, Principal at Retail Creative and Consulting Agency, says, “I believe putting screens into a retail environment when people carry their own screens does not really move the needle.”
Retailers might instead consider flipping the script and envisioning in-store displays that inspire customers to actively contribute to creating UGC. In McKinsey’s recent report on technology and the future of shopping, senior partner Kelsey Robinson asks, “Is a store just about a transaction? Or is it a place where I can offer community and experiences that are aligned with my brand — everything from a fitness class to meeting local talent or local bands?”
For the launch of his cosmetics brand, Pleasing, pop star Harry Styles opened pop-up stores in multiple cities that drew substantial crowds. Eager fans waited in line for hours to pose for selfies in front of beautifully designed branded backdrops. Product displays were staged so that customers could capture and share first-look photos of the stylish packaging.

British retailer Boohoo “created a shoppable showroom where customers could try on looks, and post them to social media,” not only gaining exposure and reach but also gleaning insights into key trends and audience demographics.
The phygital era
Now that product transactions are frequently carried out online and fulfillment facilitated offsite, in-store traffic will inevitably continue to be lower than before. While retailers want to avoid becoming glorified pick-up locations, and convenience is no longer the driver of a customer’s choice to venture out to a shop, there’s an opportunity to reposition stores as places of brand discovery and education.
In the words of Alessandro Camaioni, Strategy Director, Momentum Worldwide: “If people can effectively shop anywhere, anytime, a store’s role is less about ‘product-in-hand’ and more about engaging people with valuable sensory, emotional and ultimately memorable propositions.”
This strategy invites new expertise to the table, i.e. experience architecture, according to Brian Solis, Global Innovation Evangelist, Salesforce. In his view, bringing more technology into physical retail environments needs to, “just be in the background. It’s about creating magic.”
With UGC as a powerful catalyst at multiple stages of the customer journey, retailers need to consider how customer content and feedback can engender a more playful, engaging, and even immersive experience. Both online and in-store. It’s time to get phygital.
Said Google Canada’s Head of Marketing, Fab Dolan, “The brands that are winning are the ones that understand and own the fundamental interplay between experiential and transactional.”
To start your foray into the phygital world, you first need to collect the UGC needed to get you started. Bazaarvoice can help you with that.